Monthly Archives: December 2014
Cooking Our Garden-Grown Beans
I know it has been awhile, but waaaay back in the summer we were growing some different beans in the garden. In the Italian garden we had some borlotto beans growing and in the Indian garden we had both chickpeas (garbanzo beans) and cowpeas (black-eyed peas) growing. We harvested them and shelled them when they were dry, and they have since been sitting on bags on my desk, waiting for me to do something with them. This week was the week! I made a different dish with each type of bean so that everyone could sample them.
Step 1: Sorting
I’ve always sorted the beans when I buy bags of dry beans, but usually you are looking for small rocks and things like that. In this instance, I wasn’t concerned about rocks. I was concerned about looking for moldy beans (stored before fully dry) or damaged beans (primarily munched on by bugs).
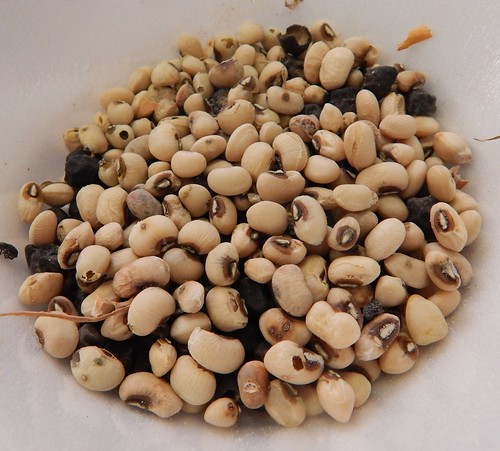 Here are the culls. There were quite a number, particularly cowpeas, that had been munched on. Different challenges with homegrown beans!
We ended up with about 3/4 cup of the ‘Black Kabouli’ Chickpeas, 1.25 cups of the cowpeas, and 1.5 cups of the Italian borlotto beans.
To put that in context a bit more:
18 sq. ft of Italian borlotto beans yielded 1.5 cups.
17.5 sq. ft. of chickpeas yielded 3/4 cup.
17.5 sq. ft. of cowpeas (that sprawled everywhere) yielded 1.25 cups.
So…certainly not a spectacular yield. It’s not to say they weren’t fun to grow, but they are more of a novelty item that a really productive use of space.
Step 2: Soaking
If you’ve never cooked dried beans before, after the sorting step you need to soak them overnight.
 These are the Italian beans. I put them in a large bowl and covered them with plenty of water.
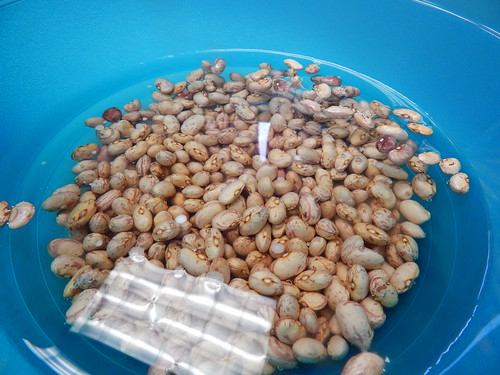 By the next morning they had absorbed quite a bit of water and were nicely puffed up.
Step 3: Cooking/Par-Cooking
Because the recipes I wanted to use called for canned beans, which are essentially pre-cooked, I decided to cook the beans plain first, and then save them for the recipes I wanted to try.
I put each type of bean in a pot, covered them with water, added a little salt, and turned on the heat. They took about an hour of simmering to get to the cooked-but-not-mushy stage. Sorry, I didn’t take any pictures. Pictures of beans boiling is only slightly more exciting than pictures of beans soaking, and I already subjected you to those!
After they were cooked, I drained and rinsed them, then refrigerated them to use later.
Step 4: Cooking into Something Tasty
I wanted to use each type of bean in a semi-authentic recipe, so the next step was finding the right one.
Chickpeas
I was planning to make hummus with the chickpeas, but the skins didn’t crack when I cooked them. I didn’t want to take the trouble to remove the skins and making hummus with the skins on would have resulted in a gritty, grey-colored hummus (the chickpeas had black skins). I ended up making Crispy Roasted Chickpeas. There are about a thousand recipes on the web for different spice variations if you care to try several flavors. I used cumin, coriander, salt, and cayenne pepper. You toss the chickpeas in olive oil and the spices and then roast them in the oven at 400 degrees for about 30 minutes or until crispy. Ironically, the skins and whole peas split while roasting, after refusing to split while boiling. Oh well.
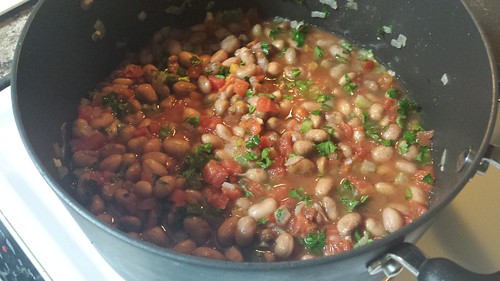
Italian Borlotto Beans
For the Italian beans, I found a recipe for Fresh Stewed Borlotti Beans that called for fresh rather than dry beans. We were past the “fresh” stage, obviously, so that’s why I par-cooked the beans first. Beyond that, it was pretty straightforward. Cook the aromatics (celery, onion, garlic) in oil, add the beans, tomatoes, and parsley. Cook until the beans are the texture you prefer.
 The beans had an interesting nutty and sweet flavor, so I didn’t cook them down too much. They were softer than they started, but still pretty much whole, not to the mushy stage.
Cowpeas
The cowpeas had ind of an interesting grassy/earthy taste after the initial cooking. Not bad, but very different from the other two. I decided to make a Cowpea and Potato Curry using them.
 If you don’t routinely cook this type of dish, it is the one that you will probably have to make a special trip to the grocery store or a specialty store to find all the ingredients. We cook a fair amount of Indian-inspired food at home, so I have all of the spices on hand. Things you may not have include: cumin, turmeric, garam masala (you can find it at Spice Merchant if you are in Wichita), fresh mint and cilantro, garlic-ginger paste (or fresh ginger to make your own).
This recipe starts by sauteing the onions, garlic, ginger, and spices, then adding the potatoes. After a few minutes you add the chickpeas, tomato puree, water, and simmer until everything is cooked. Last you add the mint and cilantro paste and cook a few more minutes. Served over rice, it will make a great vegetarian meal.
So, that is that! I have to say that cooking dry beans that you grew yourself do taste even better than cooking dry beans from the store and MUCH better than using canned beans. Each type of bean also has its own flavor profile. Still…growing dry beans is more of a fun project than anything else if you don’t have much space.


